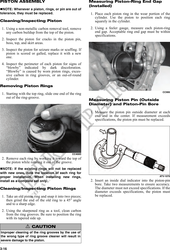
PISTON ASSEMBLY Measuring Piston-Ring End Gap
(Installed)
NOTE: Whenever a piston, rings, or pin are out of
tolerance, they must be replaced. 1. Place each piston ring in the wear portion of the
cylinder. Use the piston to position each ring
Cleaning/Inspecting Piston squarely in the cylinder.
1. Using a non-metallic carbon removal tool, remove 2. Using a feeler gauge, measure each piston-ring
any carbon buildup from the top of the piston. end gap. Acceptable ring end gap must be within
specifications.
2. Inspect the piston for cracks in the piston pin,
boss, top, and skirt areas.
3. Inspect the piston for seizure marks or scuffing. If
piston is scored or galled, replace it with a new
one.
4. Inspect the perimeter of each piston for signs of
"blowby" indicated by dark discoloration.
"Blowby" is caused by worn piston rings, exces-
sive carbon in ring grooves, or an out-of-round
cylinder.
Removing Piston Rings
CC995
1. Starting with the top ring, slide one end of the ring
out of the ring-groove.
Measuring Piston Pin (Outside
Diameter) and Piston-Pin Bore
1. Measure the piston pin outside diameter at each
end and in the center. If measurement exceeds
specifications, the piston pin must be replaced.
CC400D
2. Remove each ring by working it toward the top of
the piston while rotating it out of the groove.
NOTE: If the existing rings will not be replaced
with new ones, note the location of each ring for
proper installation. When installing new rings, ATV-1070
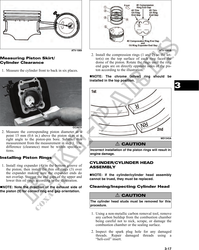
install as a complete set only. 2. Insert an inside dial indicator into the piston-pin
bore. Take two measurements to ensure accuracy.
Cleaning/Inspecting Piston Rings The diameter must not exceed specifications. If the
diameter exceeds specifications, the piston must
1. Take an old piston ring and snap it into two pieces; be replaced.
then grind the end of the old ring to a 45° angle
and to a sharp edge.
2. Using the sharpened ring as a tool, clean carbon
from the ring grooves. Be sure to position the ring
with its tapered side up.
! CAUTION
Improper cleaning of the ring grooves by the use of
the wrong type of ring groove cleaner will result in
severe damage to the piston.
3-16