6. CYLINDER HEAD/VALVES STRYKER 125/150
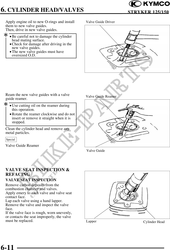
Apply engine oil to new O-rings and install Valve Guide Driver
them to new valve guides.
Then, drive in new valve guides.
· Be careful not to damage the cylinder
head mating surface.
· Check for damage after driving in the
new valve guides.
· The new valve guides must have
oversized O.D.
Ream the new valve guides with a valve Valve Guide Reamer
guide reamer.
· Use cutting oil on the reamer during
this operation.
· Rotate the reamer clockwise and do not
insert or remove it straight when it is
stopped.
Clean the cylinder head and remove any
metal particles.
Special
Valve Guide Reamer
Valve Guide
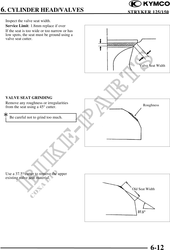
VALVE SEAT INSPECTION &
REFACING
VALVE SEAT INSPECTION
Remove carbon deposits from the
combustion chamber and valves.
Apply emery to each valve and valve seat
contact face.
Lap each valve using a hand lapper.
Remove the valve and inspect the valve
face.
If the valve face is rough, worn unevenly,
or contacts the seat improperly, the valve
must be replaced. Lapper Cylinder Head
6-11