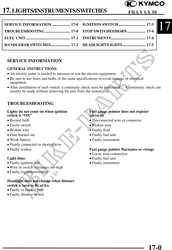
17. LIGHTS/INSTRUMENTS/SWITCHES FILLY LX 50
Fuel Unit
FUEL UNIT
No Smoking!
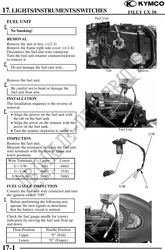
REMOVAL
Remove the met-in box. ( 2-3)
Remove the frame right side cover. ( 2-4)
Disconnect the fuel unit wire connector.
Turn the fuel unit retainer counterclockwise
to remove it.
Do not damage the fuel unit wire.
Tab Groove
Remove the fuel unit.
Be careful not to bend or damage the
fuel unit float arm.
INSTALLATION
The installation sequence is the reverse of
removal.
· Align the groove on the fuel unit with
the tab on the fuel tank.
· Align the arrow on the retainer with the
arrow on the fuel tank.
· Turn the retainer clockwise to secure it. Fuel Unit
L/W
INSPECTION
Remove the fuel unit.
Measure the resistance between the fuel unit
wire terminals with the float at upper and
lower positions.
Wire Terminals Upper Lower
GY/W 30 686
GL/W 566 153
Y/WL/W 599 599
FUEL GAUGE INSPECTION Y/W G
Connect the fuel unit wire connector and turn
the ignition switch "ON".
Before performing the following test,
operate the turn signals to determine
that the battery circuit is normal.
Check the fuel gauge needle for correct
indication by moving the fuel unit float up
and down.
Float Position Needle Position
Upper "F" (Full)
Lower "E" (Empty)
17-1